
Growing Grapes from Seeds: Complete Step-by-Step Process
Growing grapes from seeds is one of those gardening projects that rewards patience more than anything else. It takes time, a bit of know-how, and the right conditions. But when it works, you end up with a grapevine that you built from scratch. That feeling is something else entirely.
If you have ever visited The Vineyard Patio in Barangay Laboy, Matnog, Sorsogon, you have seen what a thriving vineyard looks like up close. The place grows varieties like Shine Muscat, Crimson, Yulian, Hope, Radiant, and Baikonur across an 800 sqm vineyard. All of that started somewhere small. This guide walks you through the full process of growing grapes from seeds, from seed prep all the way to early vine care.
Why Growing Grapes from Seeds Is Different
Most commercial vineyards skip seeds entirely. They propagate through cuttings because it is faster and the results are predictable. Growing grapes from seeds, on the other hand, produces a plant that is genetically unique. The seedling will not always match its parent variety exactly. That can be a disadvantage for commercial growers, but for home gardeners or hobbyists, it is part of the appeal.
Seed-grown vines also tend to develop stronger root systems over time. They adapt more naturally to local soil and climate conditions. The trade-off is time. A seed-grown grapevine can take three to five years before it starts bearing fruit. A cutting-grown vine may fruit in two years.
Still, starting from seed teaches you something cuttings cannot. You observe every stage of development and learn what your vine actually needs at each phase.
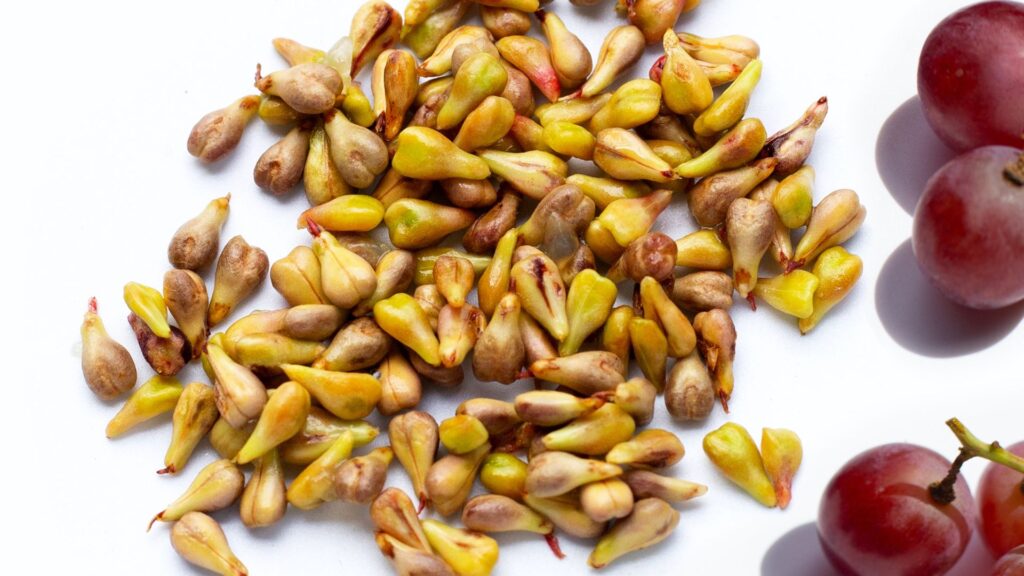
How to Prepare Grape Seeds Before Planting
Before you even touch soil, the seeds need preparation. Fresh grape seeds are surrounded by a hard outer coat. That coat blocks moisture and slows germination. You need to break that barrier before planting.
Extracting and Cleaning the Seeds
Start with ripe grapes. Cut them open and remove the seeds carefully. Rinse the seeds under cool water to remove any pulp. Pulp left on the seed can rot and encourage mold during the stratification process.
Pat the seeds dry with a clean cloth. Let them air dry for another day before moving to the next step. Do not skip the drying step. Wet seeds packed too soon will mold before they sprout.
Cold Stratification
Grape seeds need a cold period to trigger germination. This process is called cold stratification, and it mimics the natural winter conditions that seeds experience in the ground.
Here is how to do it:
- Wrap the dry seeds in a damp paper towel.
- Place the wrapped seeds inside a small zip-lock bag.
- Seal the bag and put it in the refrigerator, not the freezer.
- Keep the temperature between 1°C and 5°C (34°F to 41°F).
- Leave the seeds there for six to ten weeks.
Check the bag every week or two. Make sure the paper towel stays slightly damp but not soaking wet. If you see mold, remove the affected seeds right away and replace the towel.
Some growers also lightly nick the seed coat with fine sandpaper before stratification. This is called scarification. It helps water penetrate the seed coat faster. It is optional, but it can shorten your germination time slightly.
Growing Grapes from Seeds: The Germination Stage
After stratification, your seeds are ready to germinate. This is when you transfer them to a growing medium.
Choosing the Right Growing Medium
Use a well-draining seed-starting mix. A good mix for grape seeds contains:
- Peat moss or coco coir for moisture retention
- Perlite for drainage and aeration
- A small amount of sand to prevent compaction
Avoid garden soil at this stage. It is too heavy and often carries pathogens that can harm young seedlings.
Planting the Seeds
Fill small seed trays or individual pots with your seed-starting mix. Plant each seed about 1 cm deep. Place one seed per cell or small pot. This makes transplanting easier later.
Water gently after planting. The goal is even moisture, not wet soil. Cover the tray with a clear plastic lid or plastic wrap to trap humidity. Place the tray in a warm location with indirect light. A temperature of 20°C to 25°C (68°F to 77°F) is ideal.
Germination can take anywhere from two to eight weeks, even after stratification. Some seeds sprout quickly. Others take their time. Keep the soil consistently moist but never waterlogged.
Signs of Successful Germination
The first thing you will see is a tiny white root emerging from the seed. Shortly after, a small shoot pushes upward. Once the shoot breaks the soil surface and shows its first set of leaves, your seedling has officially sprouted. Remove the plastic cover at this point so the seedling gets fresh air.
Transplanting Young Grapevine Seedlings
Seedlings grow fast once they are established. You will likely need to transplant them two to three times before they go into the ground permanently.
The first transplant happens when the seedling has two to four true leaves. Move it from the seed tray to a small individual pot, roughly 10 cm in diameter. Use a slightly richer potting mix at this stage. Add a bit of compost to the seed-starting mix you have been using.
When to Move Outdoors
Young grapevines are sensitive to temperature swings. Before you move them outside permanently, harden them off. This means gradually introducing them to outdoor conditions over one to two weeks.
Start by placing them outdoors in a shaded spot for a few hours each day. Increase the exposure slowly. After about ten to fourteen days, they should be ready for full outdoor conditions. Skipping this step often leads to leaf scorch or stress that sets the plant back weeks.
Choosing a Permanent Planting Spot
Grapevines need full sun. Six to eight hours of direct sunlight per day is the minimum. They also need good air circulation to prevent fungal disease. Avoid spots that stay wet after rain. Standing water around the roots is one of the fastest ways to kill a young vine.
The soil should drain well. If your soil is heavy clay, mix in compost and coarse sand before planting. A slightly acidic to neutral pH of 5.5 to 7.0 suits most grape varieties.
Plant seedlings at least 1.5 to 2 meters apart. Grapevines spread wide and need space to grow without competing with each other.
Early Vine Care After Transplanting
The first year after transplanting is all about root development. The vine is establishing itself underground, which means you may not see dramatic above-ground growth right away. That is completely normal.
Watering
Water deeply but infrequently. Deep watering encourages roots to grow downward rather than staying near the surface. In the first growing season, water once or twice a week depending on rainfall. As the vine matures, you can reduce watering frequency. Established vines are surprisingly drought-tolerant.
Fertilizing
Hold off on heavy fertilizing in the first few weeks after transplanting. Too much nitrogen too soon pushes leafy growth at the expense of root development. After four to six weeks, apply a balanced fertilizer with roughly equal parts nitrogen, phosphorus, and potassium.
Phosphorus supports root development specifically. A fertilizer slightly higher in phosphorus, like a 10-20-10 ratio, can be beneficial in the first season.
Avoid over-fertilizing. Excess nutrients cause the vine to put all its energy into leaves and shoots rather than building a strong root system.
Training and Support
Young vines need support from the start. Install a stake or small trellis at planting time. As the seedling grows, tie the main shoot loosely to the support using soft plant ties or strips of cloth. Avoid anything that cuts into the stem.
In the first year, focus on developing one strong main stem. Pinch off side shoots that appear below the top third of the vine. This concentrates the plant’s energy into vertical growth and building a strong trunk.
Pest and Disease Watch
Young grapevines are vulnerable. Watch for aphids, spider mites, and leafhoppers. Check the undersides of leaves regularly. Remove pests by hand or use a diluted neem oil spray.
Fungal diseases like powdery mildew are a common issue, especially in humid conditions. Good air circulation around the vine helps prevent this. If you spot white powdery patches on the leaves, treat with a diluted baking soda solution or a sulfur-based fungicide.
Growing Grapes from Seeds in Tropical Conditions
The Philippines presents unique conditions for growing grapes. High humidity, warm temperatures year-round, and a wet season that lasts months make grape cultivation challenging but not impossible.
The varieties grown at The Vineyard Patio in Matnog were selected specifically for tropical adaptability. Varieties like Anuta, Brazilian Hybrid, and Shakhtar are among those cultivated there. These types tend to handle heat and moisture better than traditional European varieties.
If you are growing grapes from seeds in the Philippines, here are a few adjustments to keep in mind:
- Stratification may need refrigeration since natural cold periods do not occur in tropical climates.
- Drainage is non-negotiable. During rainy season, waterlogged roots are a real risk.
- Shade cloth can help seedlings during the hottest months, especially in lowland areas.
- Pruning after the wet season encourages fruiting cycles that align with the dry months when sun exposure is highest.
What Seeing a Vineyard Teaches You
Reading about grape growing is one thing. Seeing it in person gives you a completely different perspective. The Vineyard Patio is the first grape-picking destination in Sorsogon. It sits in Purok 5, Barangay Laboy, Matnog, and it is open from Monday to Saturday starting at 11 AM, and 1 PM on Sundays. Pre-booked guests can arrange earlier access for the grape-picking experience.
Walking through an 800 sqm vineyard and seeing how the vines are trained, how they are spaced, and how different varieties look at peak season gives you a hands-on reference that no guide can fully replicate. The dine-in restaurant on-site pairs the vineyard experience with local seafood and grilled dishes in a rustic gazebo setting overlooking the vines.
If you are planning a visit from nearby areas, The Vineyard Patio is about 10 minutes from Irosin, 30 minutes from Bulan, and 45 minutes from Sta. Magdalena and Bulusan. Barangay Laboy is the first barangay in Matnog, and from the Matnog Port, the drive is about 30 minutes. The scenery along the way makes the trip worthwhile.
Growing Grapes from Seeds Takes Time, but It Pays Off
The full process from seed to fruit is a long one. There is no shortcut around the stratification period, the careful germination stage, or the slow root establishment that happens in the first year. But every step teaches you something about how grapevines actually work.
Starting from seed puts you in control of the entire life cycle. You understand the plant’s needs because you have watched it develop from the very beginning. And when that vine eventually produces its first fruit, you will know exactly what went into making that happen.
For more on what a working vineyard looks like in the 2nd district of Sorsogon, visit The Vineyard Patio and see it for yourself. It is a good reminder of where patience and the right conditions can take a single grape seed.